Skip to content
Want to know how sunlight becomes usable electricity at your home? This friendly introduction lays out the key ideas so you can follow the rest of the article with confidence.
The heart of a Basic Solar Power System is simple: panels harvest sunlight via the photovoltaic effect, producing DC current. An inverter then converts that DC into AC electricity for household use.
Core components include panels, an inverter, racking, wiring, disconnects, and optional batteries or a charge controller if you go off-grid. Warranties vary: panels often carry 25-year guarantees, inverters 10–20 years, and batteries depend on chemistry.
This article walks you, step by step, through how systems connect, how energy flows, and why net metering can credit exported generation to lower bills. You’ll also get practical notes on longevity and how different setups—grid-tied, off-grid, or hybrid—match goals for savings and resiliency.
Key Takeaways
- Panels convert sunlight to DC; the inverter makes household AC electricity.
- Major components: panels, inverter, racking, wiring, disconnects, and optional batteries.
- Typical lifespans: panels ~25 years; inverters 10–20; batteries vary by chemistry.
- Net metering can offset usage by crediting exported energy to the grid.
- Choose grid-tied, off-grid, or hybrid designs to fit your goals for savings and resilience.
Start Here: What a Basic Solar Power System Is and How It Works
Sunlight hitting silicon cells begins a chain that ends with electricity running your home. Solar panels absorb sunlight and produce direct current (DC). That DC travels to an inverter that makes alternating current (AC) compatible with household wiring.
The inverter is the smart device that syncs with grid frequency so the AC is safe and usable. In grid-tied setups, extra electricity flows back through your service panel and meter to the utility.
When the sun is low, your home pulls energy from the grid unless you add batteries. Every installation includes safety gear like disconnect switches and code-compliant rapid shutdown to protect homeowners and responders.
“Think of the setup as a loop: panels make DC, the inverter makes AC, the home uses what it needs, and surplus can be exported or stored.”
Want more detailed information? Check our concise guide on solar power 101 to compare layouts and choose gear that fits your goals for reliability, savings, and simplicity.
- Panels → DC; inverter → AC for home use.
- Inverter synchronizes with the grid for safe import/export.
- Safety features and local codes keep installations secure.
Core Components You’ll Use in a Basic Solar Power System

A functioning array depends on a compact set of equipment that work together to harvest and deliver electricity.
Solar panels and mounting hardware: capturing sunlight and staying secure
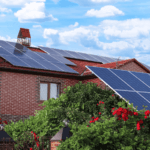
Panels are typically 60- or 72-cell modules mounted on engineered racking. Rooftop mounts are common, but ground and pole mounts are options.
Good racking keeps modules ventilated for better efficiency and resists wind and snow loads.
Inverters and wiring: converting DC to AC for home electricity
Inverters include string units, microinverters, and power optimizers. String inverters are cost-effective when shading is minimal. Microinverters manage each panel independently for clearer monitoring.
Wiring, conduit, and overcurrent protection keep the installation safe and code-compliant.
Energy storage basics: when batteries are required and when they’re optional
Storage is optional for grid-connected setups but required off-grid. Lead-acid is cheaper but needs upkeep; lithium costs more and lasts longer.
Safety and balance-of-system: racking, conduit, disconnects, and monitoring
Balance-of-system components—disconnects, junction boxes, and Internet monitoring—simplify maintenance and troubleshooting.
“A clean layout and labeled equipment speed inspections and give homeowners peace of mind.”
- Learn component details in a concise solar components guide.
- For a broader overview see a basic system overview.
Choosing Your System Type: Grid-Tie, Off-Grid, or Hybrid with Storage

Your choice between grid-tied, off-grid, or hybrid setups determines how electricity flows and who you rely on.
Grid-tied setups and net metering credits for your utility bills
Grid-tied systems are usually the lowest-cost investment per watt and often deliver the fastest payback.
When your panels make more than you use, exported electricity can earn a credit on your utility bill.
Check with your utility early about interconnection, meter changes, and how exports are tracked so credits match your expectations.
Off-grid systems for remote property and full energy independence
Off-grid designs remove the grid from the equation and require robust energy storage and charge control.
That means more batteries, careful sizing, and a higher upfront cost, but you gain independence where grid access is infeasible.
Hybrid setups: backup power, time-of-use rates, and demand management
Hybrid options blend the two: stay connected to the grid while adding storage for outages and rate optimization.
With time-of-use pricing, a hybrid can charge batteries when rates are low and discharge during peaks to lower bills.
“Talk with your utility and pick an inverter strategy early—some hybrid inverters make adding storage simple.”
- Choose grid-tied to save money and use net metering credits.
- Pick off-grid for remote property where reliability matters most.
- Consider hybrid to combine backup, TOU savings, and smooth integration with existing panels.
Placing Your Array: Rooftop Solar vs. Ground Mounts and Optimal Orientation
Deciding where panels live on your property shapes how much energy you’ll capture each year. Placement affects installation cost, yearly production, and how easy it is to maintain the array.
Rooftop, ground, and pole mounts — practical trade-offs
Rooftop installations often cost less because the roof serves as the foundation for racking. That reduces materials and labor compared with building a ground substructure.
Ground mounts work well when the roof is shaded, undersized, or architecturally complex. They make cleaning and expansion easier and can sit where sunlight is best.
In snowy regions, pole mounts let you set a steeper tilt and extra clearance so panels shed snow faster and keep production higher in winter.
Orientation, tilt, shading, and airflow for better efficiency
Aim for a south-facing orientation in the Northern Hemisphere and a tilt near your latitude for strong year-round production. Many roofs with different orientations still perform well with thoughtful design.
Preserve airflow under panels to reduce heat buildup and protect efficiency. Cooler modules run closer to ideal temperatures and maintain better output.
“If shading is unavoidable, consider microinverters or optimizers to limit losses at the panel level.”
- Track shading through the day and across seasons before final placement.
- Trackers boost production but add cost and moving parts; for most homes, adding panels is more cost-effective.
- Plan clear access paths for inspection and follow local fire setbacks and code rules.
For a deeper comparison of mounting options and racking choices, review this guide on ground vs. roof mount racking.
Plan and Size Your System Step by Step

Begin by measuring how much electricity your home uses across a full year. Gather 12 months of utility bills to see seasonal peaks and your annual kWh. That baseline guides the target capacity and helps project how much energy you need to produce.
Assess site, sunlight, and yearly usage
Check roof tilt, orientation, and shading across seasons. Note usable roof or ground space so the panel layout fits the property.
Select the right panels and efficiency trade-offs
Compare monocrystalline and polycrystalline modules. Mono often offers higher efficiency (15–24%) and smaller footprint, while poly can lower cost per watt. Match module choice to your budget and space.
Pick an inverter strategy and storage approach
For shaded or complex roofs, choose microinverters or optimizers for panel-level output. If your site has full sun, a string inverter can cut initial cost.
Battery decisions: decide on chemistry, capacity, and backup priorities. Lead-acid is cheaper but lasts fewer years; lithium carries longer warranties and faster charge rates. Size storage to support the loads you must keep on during outages.
“Start with real usage data, then match modules, inverter type, and storage to your goals.”
- Use 12 months of bills to set system size.
- Balance efficiency vs. cost when choosing panels.
- Plan for future loads and validate structural and electrical capacity.
From Design to Interconnection: Installation, Safety, and Utility Steps

A safe, code-compliant installation depends on careful design, correct wiring, and utility coordination.
DIY vs. hiring a pro: many homeowners hire a licensed installer for speed, warranty coverage, and fewer scheduling headaches. Doing it yourself can lower labor costs, but it requires permit know-how and close coordination with inspectors.
Permits, inspections, and meter changes
Permit sets usually include structural plans, electrical line diagrams, and labeling for shutdowns. Inspectors confirm compliance before the utility will allow interconnection.
Expect the utility to review your application and often replace a mechanical meter with a digital TOU meter to track exports and credits on your bill.
Safety, equipment life, and tidy wiring
Installations must have accessible disconnects and rapid shutdown so first responders stay safe. Inverters commonly carry 10–20 year warranties and may need replacement during the life of your investment.
A neatly run conduit, protected wiring, and clear labeling cut inspection time and reduce nuisance trips. After permission to operate, monitor production to spot faults or shading quickly and protect long‑term value.
“Compare proposals on equipment, warranties, expected production, and service response—not just on price—to truly save money over the years.”
- Weigh labor savings against warranty and code confidence when choosing DIY or pro.
- Submit structural and electrical plans for permits and schedule inspections early.
- Coordinate with your utility for meter swaps, interconnection approval, and net metering credit on your bill.
Conclusion
,
This guide leaves you ready to weigh options, compare quotes, and start a home solar project with confidence. Use the fundamentals here to ask smart questions about panels, inverter choices, and how storage fits your needs.
With good orientation, tilt, and ventilation your array will run more efficiently and deliver savings for years. Grid-tied layouts often maximize credit value, while hybrid setups add backup and flexibility. Off-grid designs require careful sizing and more storage to cover nights and cloudy days.
Invest in quality equipment and proper design to reduce surprises and lower lifetime costs. Keep an eye on rate and policy changes that affect bills and payback. Use this article as your blueprint when you meet installers and make choices that match your goals for renewable energy and comfort at home.
FAQ
What is a basic solar power setup and how does it work?
What are the core components I’ll see in a small home installation?
Do I need batteries, or can I stay grid-tied?
What’s the difference between grid-tied, off-grid, and hybrid systems?
How do I choose between rooftop, ground mount, or pole mounts?
How do orientation, tilt, and shading affect panel output?
How do I size a system for my home’s energy use?
Which panel type and inverter strategy should I pick?
What should I know about battery choices and chemistry?
Can I install a system myself, or should I hire a pro?
What permitting and utility steps are required before turning on the array?
How long do panels, inverters, and batteries typically last?
Will adding panels reduce my electric bills and carbon footprint?
What incentives, credits, or rebates should I check before installing?
How do I monitor system performance and spot problems?
What warranties and maintenance should I expect?